
With your Cala in Home Assistant, you can start Boost from your own automations, react when Boost turns on or off, send your electricity rates to Cala, and track your Cala's energy use on the Energy dashboard.
Start and stop Boost from an automation
The Cala integration adds two actions you can use in automations and scripts:
cala.start_boost(Start Boost): starts Boost. Set Duration (hours) anywhere from 1 to 168 hours (one week). If you leave it out, Boost lasts 24 hours.cala.stop_boost(Stop Boost): stops Boost.
Both need your Cala's device ID in Device ID.
Example: Boost the afternoon before guests arrive
-
In Home Assistant, go to Settings → Automations & scenes and click Create automation.
-
Add a trigger, for example a time of day or a calendar event.
-
Add an action, search for Cala and choose Start Boost.
-
In Device ID, type your Cala's device ID. In Duration (hours), choose how long Boost should last.
-
Save the automation. When it runs, Boost turns on, and the Cala app and your Cala's screen show it.
The same automation in YAML:
alias: Boost before guests arrive
triggers:
  - trigger: time
    at: "14:00:00"
actions:
  - action: cala.start_boost
    data:
      device_id: 2601XXA000
duration: 12Do something when Boost turns on or off
The Boost Mode On sensor is on while Boost is running. Its entity ID
looks like binary_sensor.cala_water_heater_boost_mode_on. Use it as an automation
trigger or condition, for example to send yourself a notification when Boost ends.
alias: Tell me when Boost ends
triggers:
  - trigger: state
    entity_id: binary_sensor.cala_water_heater_boost_mode_on
    from: "on"
    to: "off"
actions:
  - action: notify.notify
    data:
      message: Cala has finished boosting.
Check the exact entity ID on your Cala's device page; it depends on your device's name.
Send your electricity rates from Home Assistant
Cala heats more when electricity is cheap. Most people add their rates in the Cala app (see Add your time-of-use rates). If your rates live in Home Assistant, you can send them to your Cala from there instead, in one of two ways.
Enter your rate sheet on the Cala rates card
-
Open a dashboard, click the pencil to edit it, then click Add card.
-
Search for Cala and choose the Cala time-of-use rates card (
custom:cala-tou-card). If you have more than one Cala, pick the heater in the card's editor. Save the dashboard. -
On the card, enter your default rate in $/kWh. Every hour that no rule covers uses this rate.
-
If your rates change by season, tick Rates change by season and add the season that's different (for example summer, June 1 to September 30). "Rest of year" covers every other date for you.
-
Add one rule for each line on your rate sheet: choose the season, tap the days it applies to, type the from and to times, and type the rate. Times can be typed the way you'd write them, like 4:30pm or 16:30, and can run past midnight. Press Enter in the rate box to start the next rule with the same season and days.
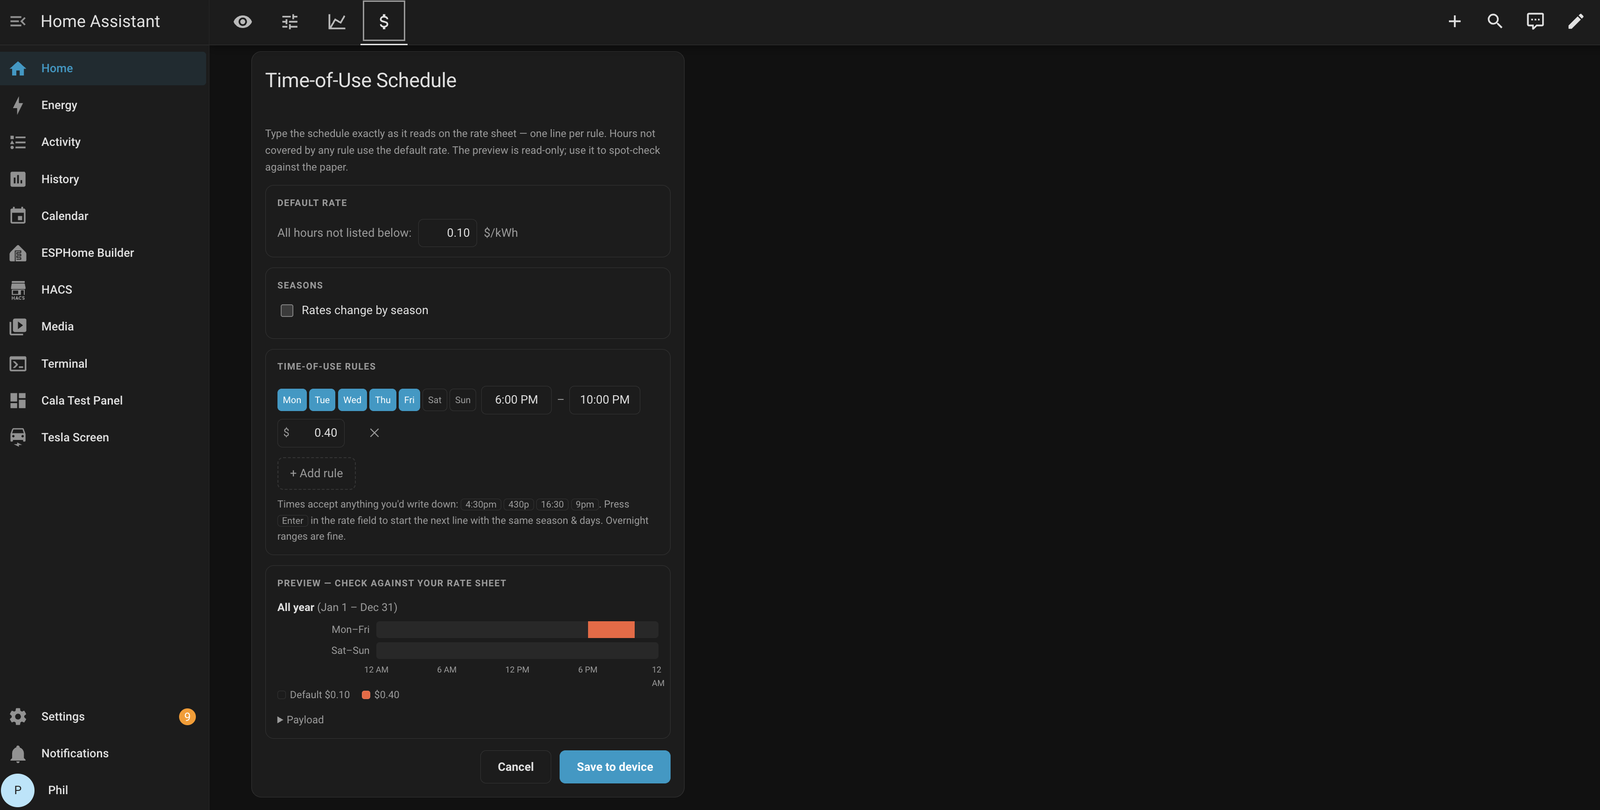
One rule on the Time-of-Use Schedule card, with the preview below it. -
Check the preview bars against your rate sheet. If two rules overlap, the card marks them with ⚠ and the earlier rule wins.
-
Click Save to device. The card shows whether your Cala accepted the rates.
Follow a live price feed
If you already have a price sensor in Home Assistant from Nord Pool, ENTSO-E, Tibber or an OpenADR 3 utility program, Cala can follow it automatically.
-
In Home Assistant, go to Settings → Devices & services → Cala and click Configure.
-
Choose Settings (TOU price feed, publish interval), then click Submit.
-
In TOU price feed entity (Nord Pool, ENTSO-E, Tibber, OpenADR3), choose your price sensor.
-
Click Submit. Each time the prices change, the integration turns the day's prices into a rate schedule and sends it to your Cala.
While a price feed is working, it controls your Cala's rates and the rates card becomes read-only, naming the feed in charge. To type rates on the card again, clear the TOU price feed entity (Nord Pool, ENTSO-E, Tibber, OpenADR3) setting.
Track your Cala's energy use
Add your Cala to the Energy dashboard to see how much electricity it uses each day alongside the rest of your home.
-
In Home Assistant, go to Settings → Dashboards → Energy.
-
Under Individual devices, add a device and choose your Cala's Energy Total sensor.
-
Save. Your Cala's energy use appears on the Energy dashboard, usually within an hour or two.