
If you run Home Assistant at home, you can pair your Cala with it over your own network. You'll see live tank temperatures, hot water available, power and water use in Home Assistant, and you can start or stop Boost from your dashboards and automations. Your Cala keeps working with the Cala app as usual.
Install the Cala integration
-
In Home Assistant, open HACS.
-
Open the menu (⋮) at the top right and choose Custom repositories.
-
In the repository box, paste
https://github.com/cala-systems/cala-home-assistant. For the type, choose Integration, then add it.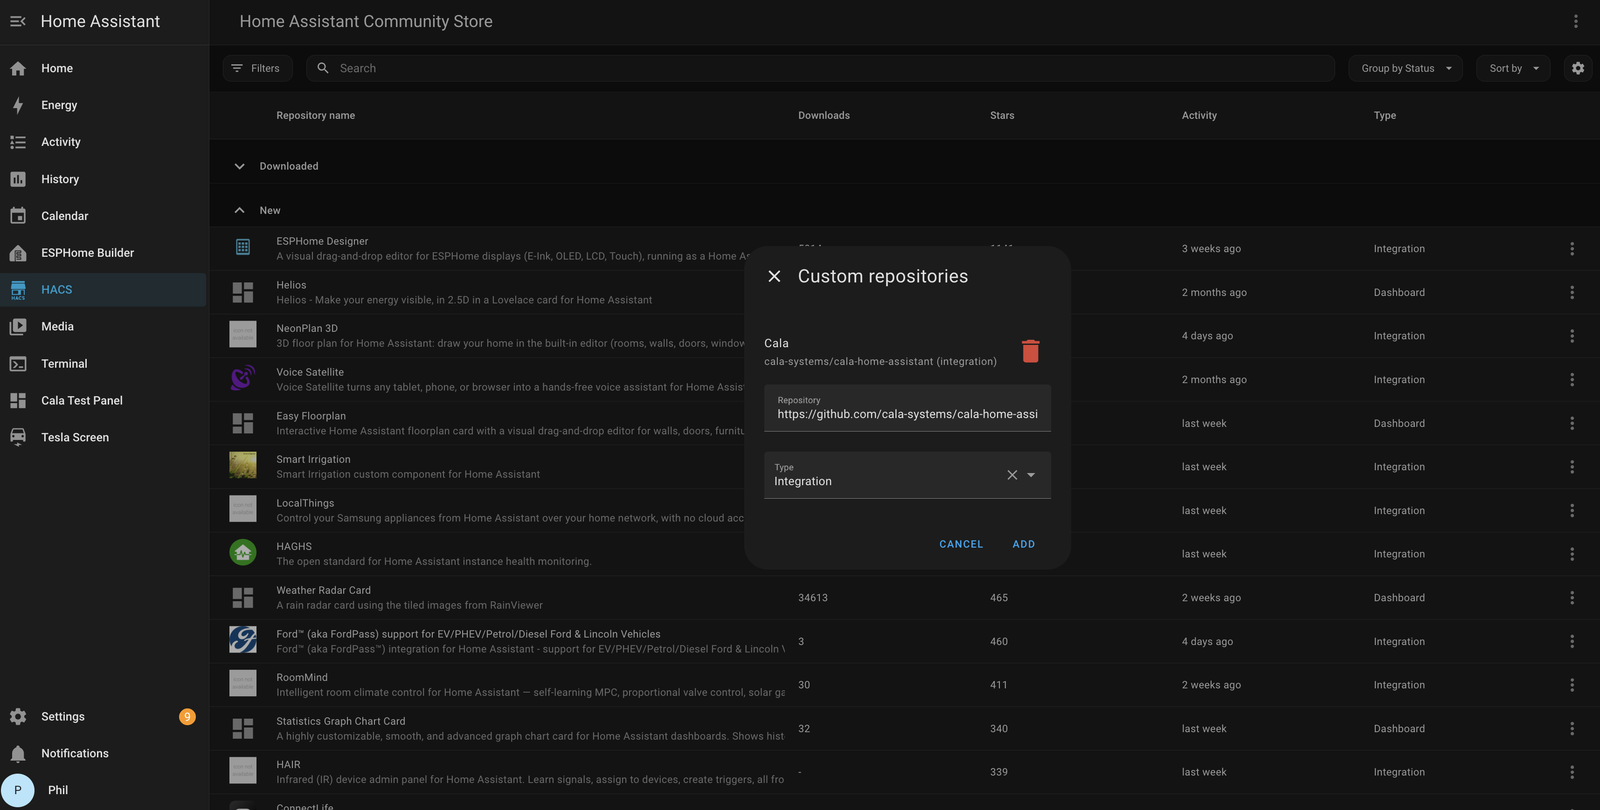
Adding the Cala repository in HACS. -
Search HACS for Cala and install it.
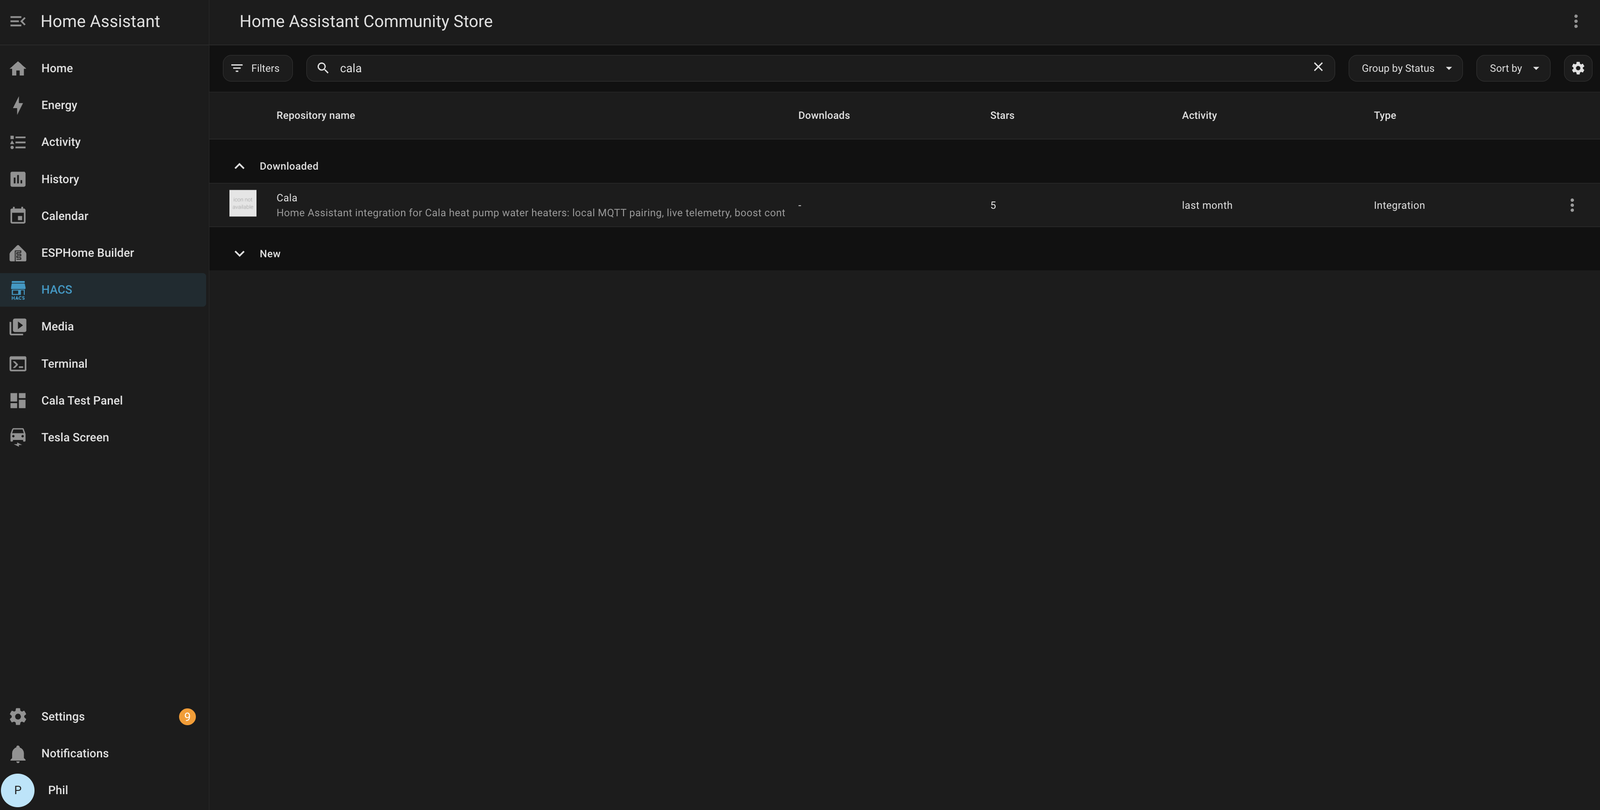
Search HACS for Cala. -
Restart Home Assistant (Settings → System → restart).
Create a login for Cala in your MQTT broker
Your Cala needs its own username and password to send readings to your broker.
-
In Home Assistant, go to Settings → Add-ons → Mosquitto broker.
-
Open the Configuration tab and add a new login with a username and password just for Cala.
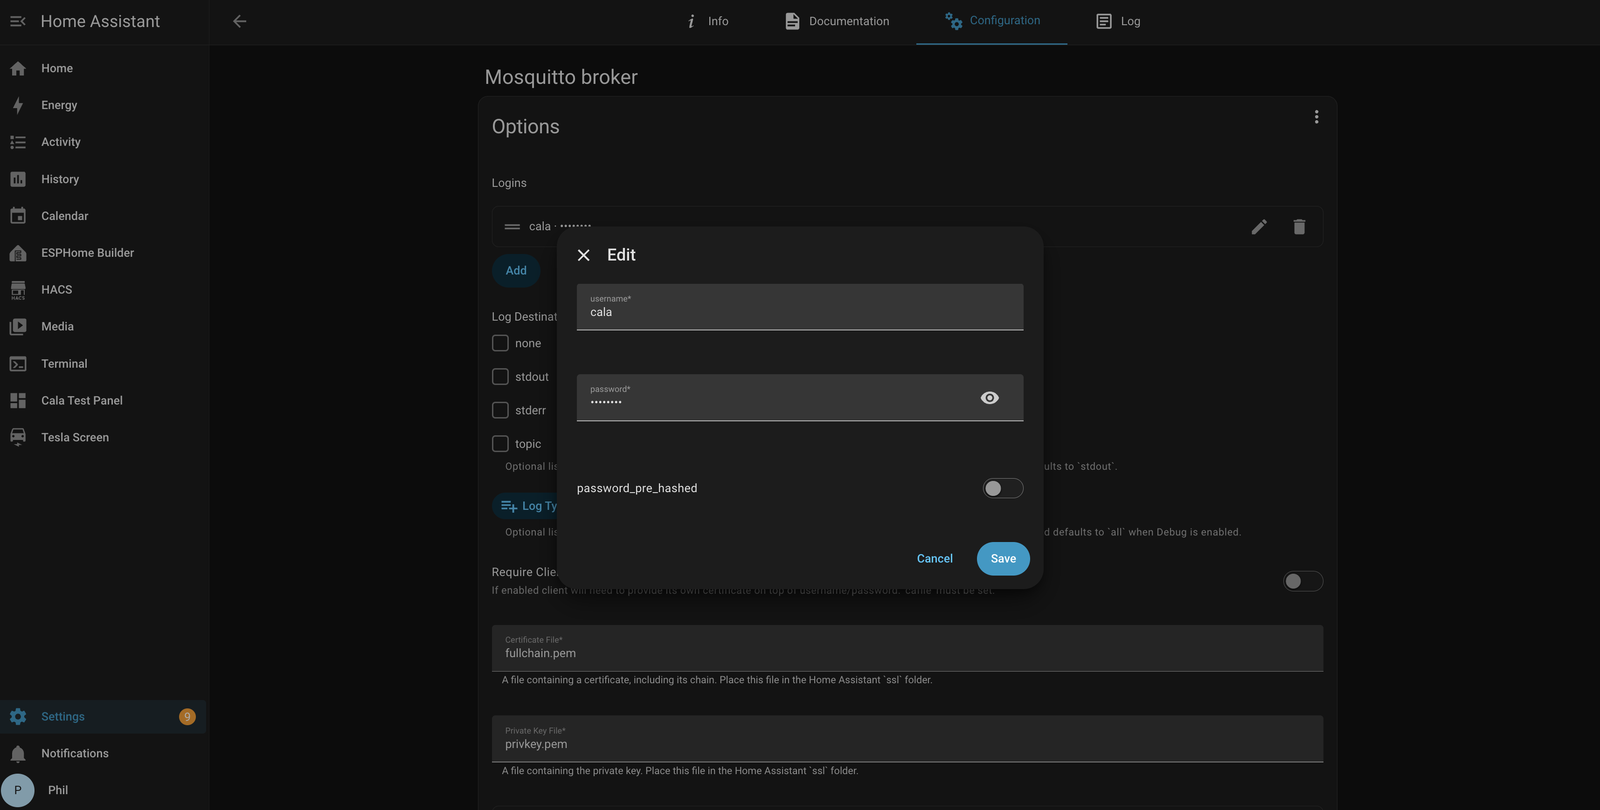
A login for Cala under Logins in the Mosquitto broker's Configuration tab. -
Save, and write down the username and password. You'll need them in a moment.
If you use a different MQTT broker, create the login there instead.
Pair your Cala
-
On your Cala's screen, from the Home screen, press Up or Down until SETTINGS is highlighted, then press Select.
-
Press Down until ADVANCED is highlighted, then press Select.
-
Press Down until HOME ASSISTANT is highlighted, then press Select. The HOME ASSISTANT screen shows a pairing code, your heater's Device ID: and its IP Address:.
The pairing code, Device ID and IP Address on your Cala. -
Leave your Cala on this screen until pairing is finished. Your Cala only accepts pairing while this screen is open.
-
In Home Assistant, go to Settings → Devices & services. Your heater appears as a discovered card named "Cala" followed by its device ID.
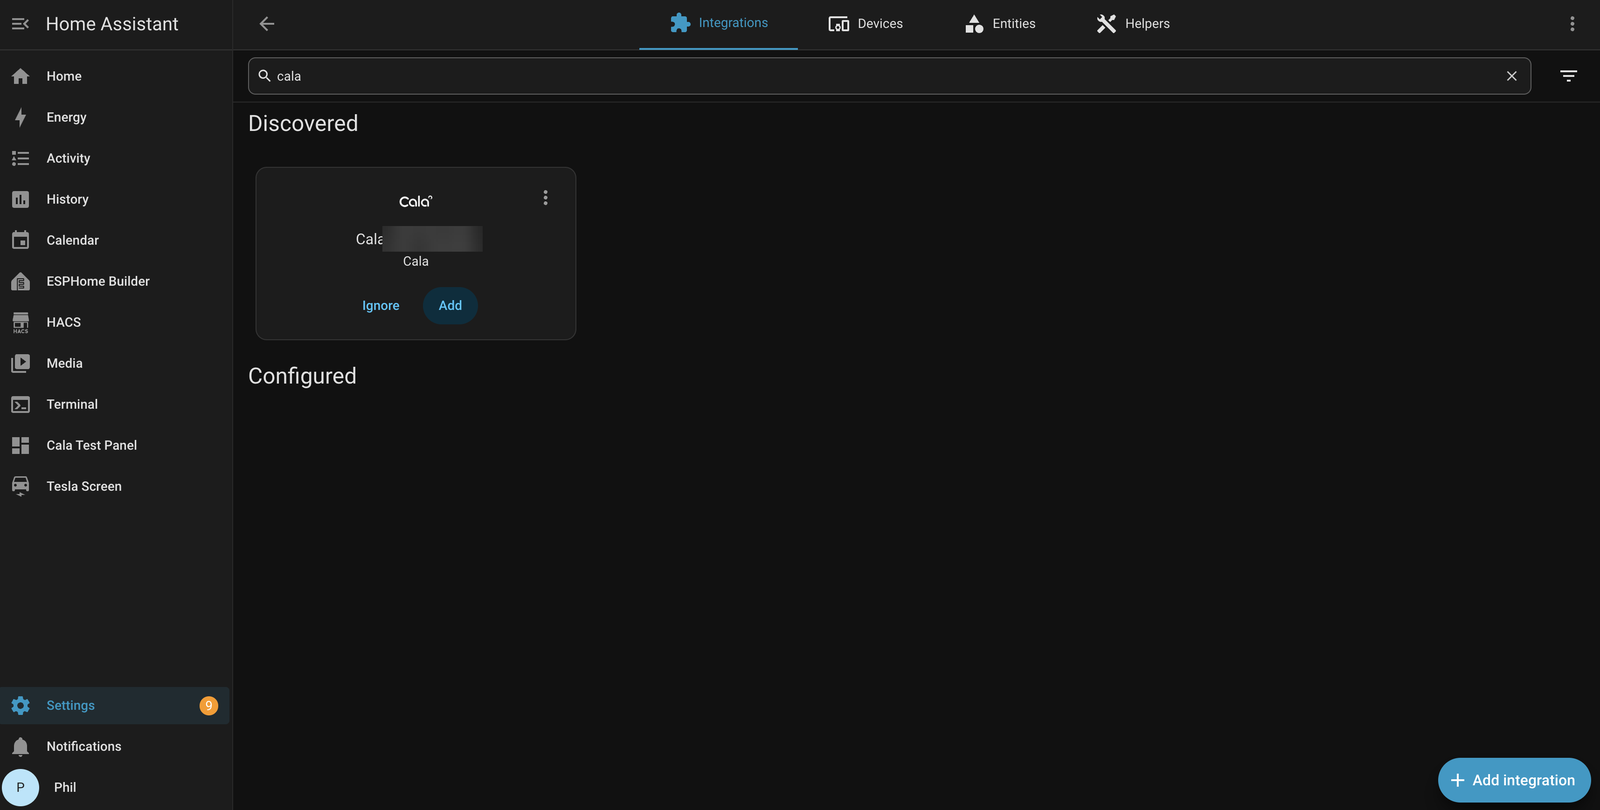
Your Cala shows up under Discovered. Click Add. -
Click Add on the Cala card. A form asks for your pairing details.
-
In Provisioning code, type the pairing code from your Cala's screen.
-
In MQTT username and MQTT password, type the login you created for Cala.
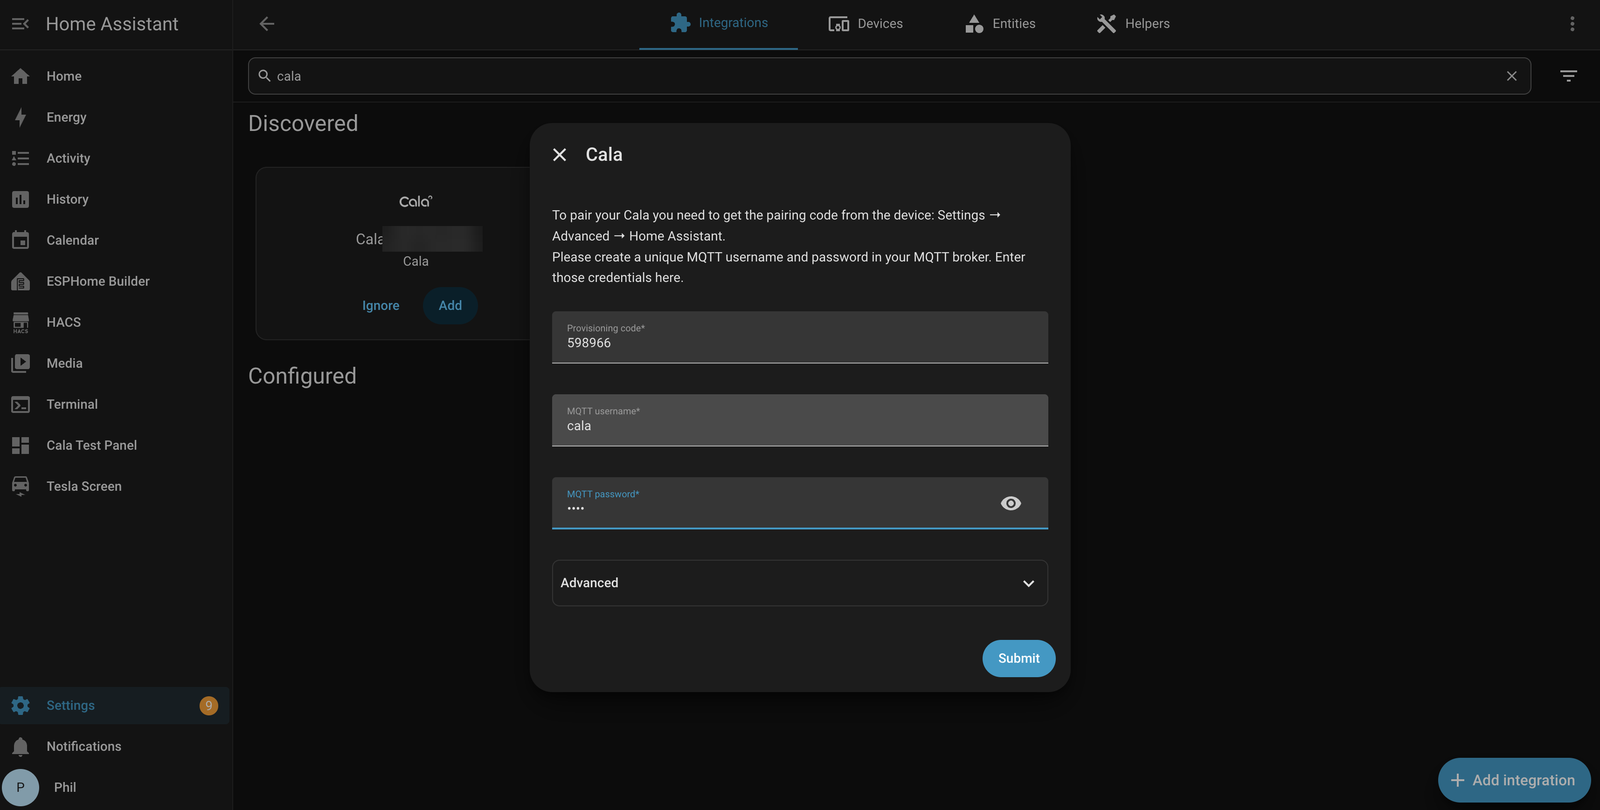
Enter the pairing code and the MQTT login you created. -
Click Submit. Home Assistant adds your Cala, and the HOME ASSISTANT screen on your Cala changes to show MQTT Broker:, Username: and Status: Connected.
After pairing, Status: shows Connected. -
Home Assistant asks you to name the device and choose an Area. Change them if you like, then click Finish.
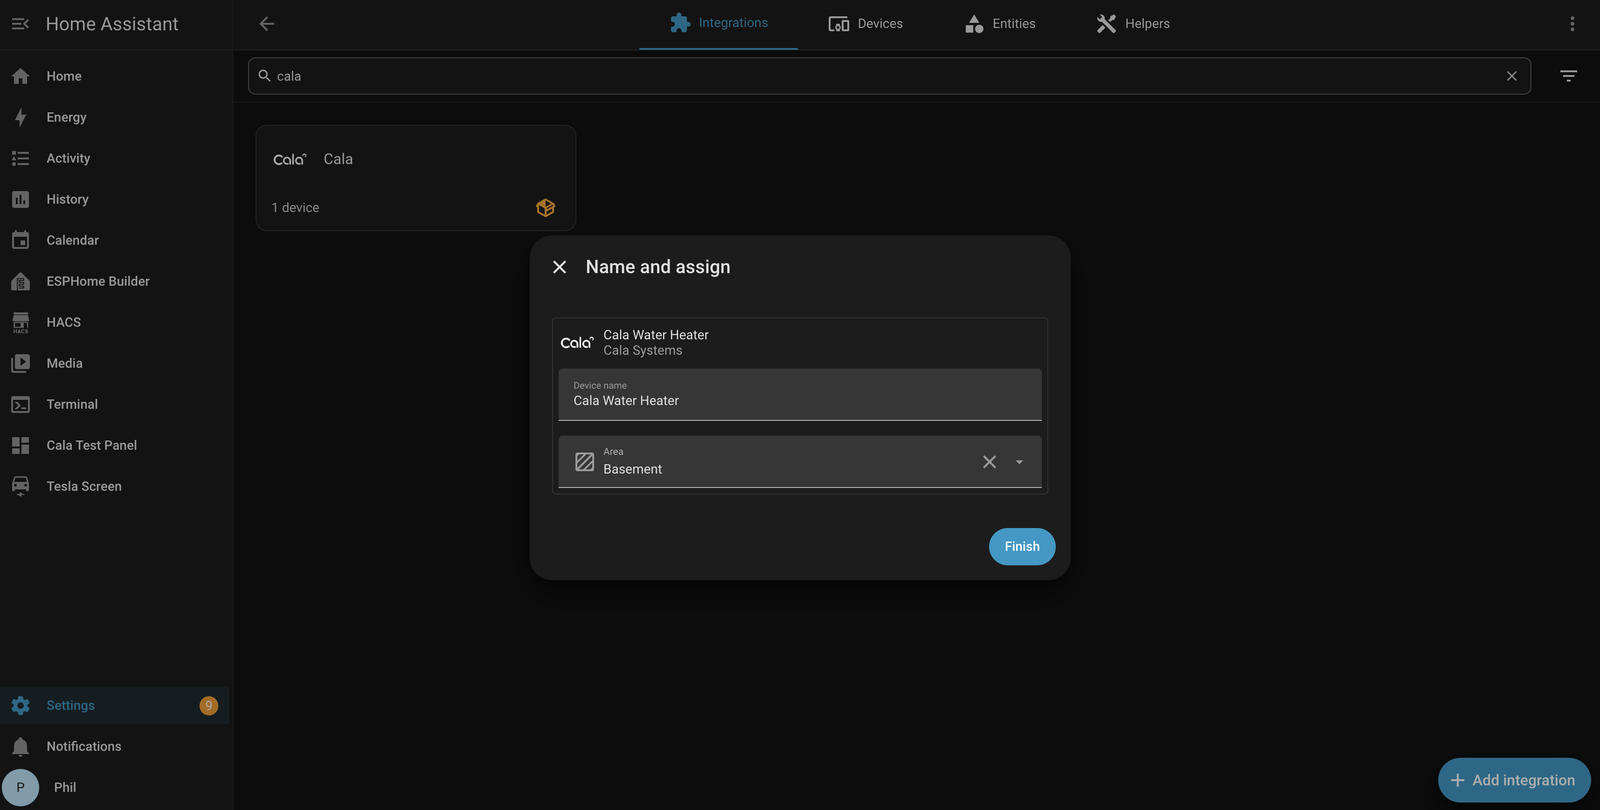
Name your Cala and pick a room, then click Finish. -
On your Cala, press Select with DONE highlighted to go back.
If your Cala isn't discovered
You can add it by hand. Keep your Cala on the HOME ASSISTANT screen.
-
In Home Assistant, go to Settings → Devices & services, click Add integration and choose Cala.
-
Choose Manual setup.
-
In Device host or IP address, type the IP Address: shown on your Cala's screen. Leave Device port as it is.
-
In Device ID, type the Device ID: shown on your Cala's screen, exactly as shown (for example 2601XXA000). Don't type the IP address here.
-
Click Submit, then finish with the pairing code and MQTT login as above.
What you get in Home Assistant
Your Cala appears as a device under Settings → Devices & services → Cala.
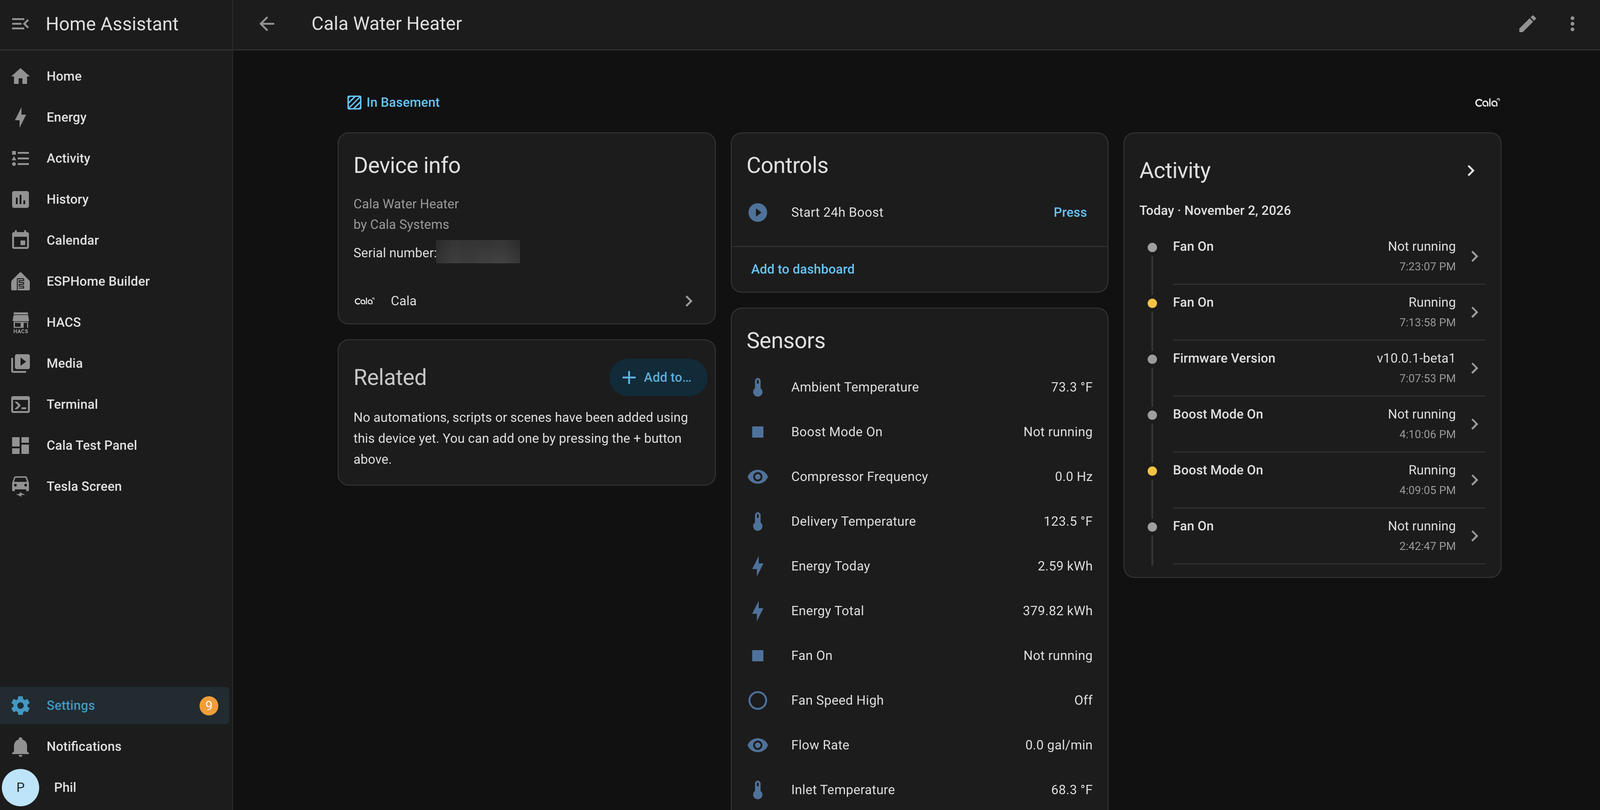
It includes:
- Temperatures: Top Temperature, Upper Temperature, Lower Temperature, Delivery Temperature, Inlet Temperature and Ambient Temperature.
- Hot water and energy: Water Available, Flow Rate, Power, energy used today and in total, and water used today and in total.
- What's running: Upper Element On, Lower Element On, Fan On, Fan Speed High, Compressor Frequency and Boost Mode On.
- A Boost button: it reads Start 24h Boost when Boost is off and Stop Boost when it's on.
- Connection details: a connection status, plus Wi-Fi and firmware details.
Add the Cala card to a dashboard
The integration includes a dashboard card that draws your Cala with its live tank temperatures, fan and heating elements, and a BOOST HEAT button. There's nothing extra to install.
-
Open a dashboard, click the pencil to edit it, then click Add card.
-
Search for Cala and choose the Cala card. If you have more than one Cala, pick the heater in the card's editor.
-
Save. The card shows your heater, and its status dot turns red if your Cala goes offline.
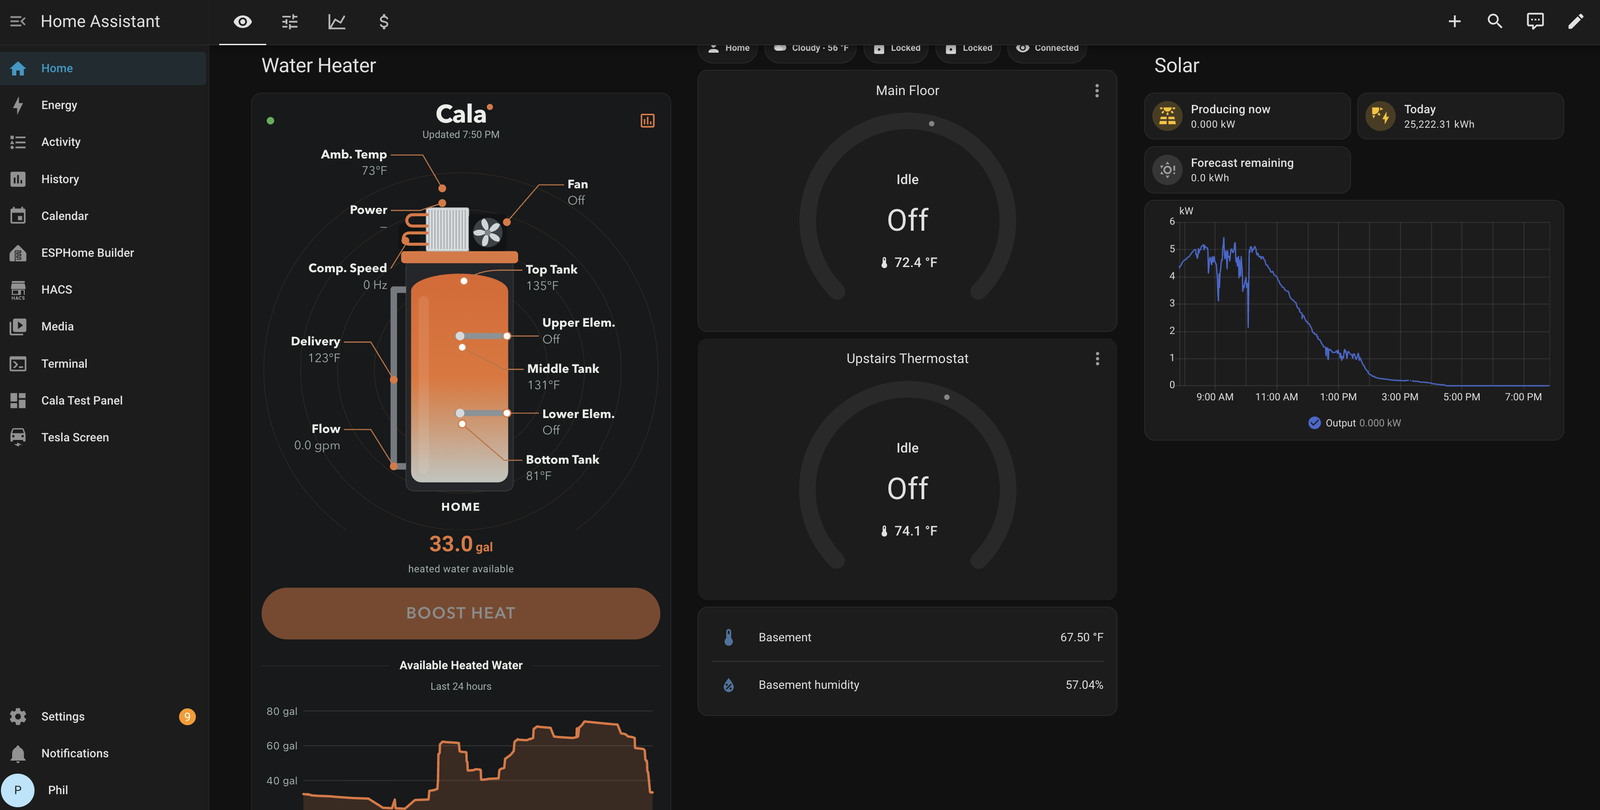
The Cala card on a Home Assistant dashboard.
If you prefer YAML, the card is type: custom:cala-card. There's also a card for
entering electricity rates; see Automate Cala with Home Assistant.
If pairing doesn't work
- "Home Assistant messaging (MQTT) is not set up": set up the MQTT integration in Settings → Devices & services, then try again.
- "Could not reach the device at…": make sure your Cala is still on the HOME ASSISTANT screen, and that the IP address is right. Then try again.
- "The device could not decrypt the request…": the pairing code is almost always wrong. Re-read the pairing code on your Cala's screen and try again.
- "The pairing code was accepted, but the device rejected the device ID…": in manual setup, type the device ID exactly as your Cala shows it, not the IP address.
- "The device answered but did not return pairing credentials…": make sure your Cala has its latest update. See Firmware updates.
- Your Cala doesn't show up in Home Assistant after pairing: check that your MQTT broker is running and that the Cala login is correct. Home Assistant's logs are under Settings → System → Logs.
If Home Assistant says your Cala appears offline
When Home Assistant hasn't heard from your Cala for a while, it shows a repair called "Cala device … appears offline". First check that your Cala is on and connected to Wi-Fi (see Change Wi-Fi or reconnect an offline heater). If your Cala was reset or disconnected from Home Assistant, pair it again:
-
On your Cala's screen, open SETTINGS → ADVANCED → HOME ASSISTANT and note the pairing code.
-
In Home Assistant, go to Settings → Devices & services → Cala and click Configure.
-
Choose Re-provision device (pairing code, broker, credentials), then click Submit.
-
Enter the pairing code and your MQTT login, then click Submit. Your Cala's screen shows Status: Connected.
Check the connection in the Cala app
-
In the Cala app, tap the menu icon at the top left, then tap SYSTEM INTEGRATIONS.
-
Tap Home Assistant. The HOME ASSISTANT screen opens.
-
Before pairing, the screen shows your Cala's PAIRING CODE (the same code as on your Cala's screen) and the steps under HOW TO CONNECT. Tap VIEW THE SETUP GUIDE to open Cala's Home Assistant setup guide.
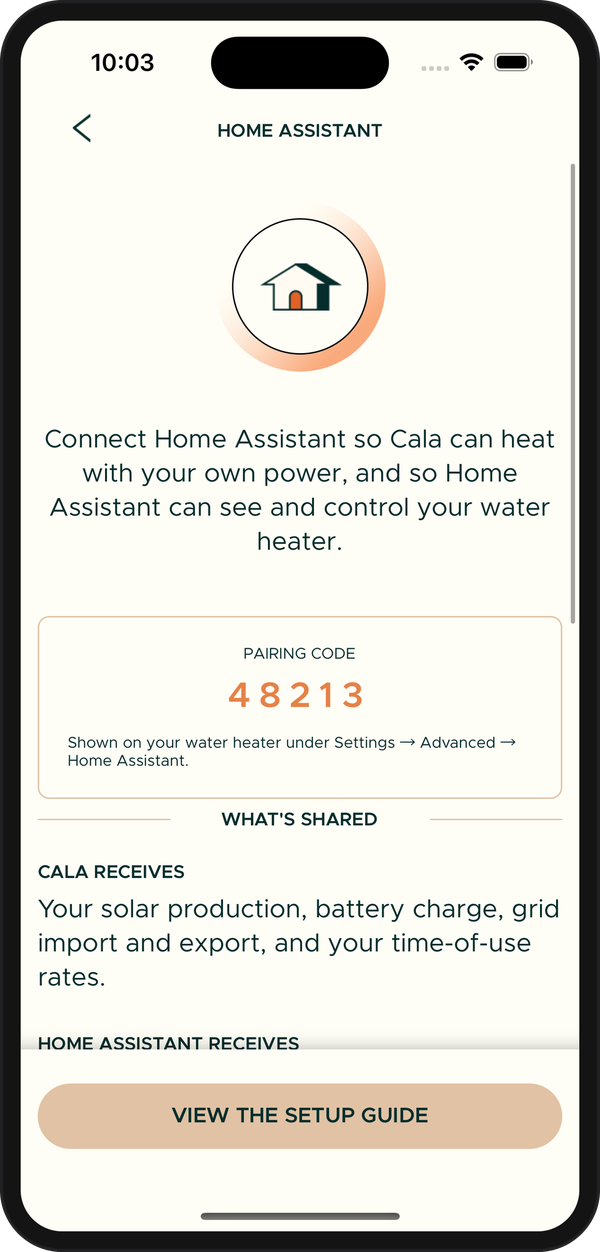
Before pairing, the app shows your Cala's pairing code. -
After pairing, the screen shows Home Assistant CONNECTED. Tap VIEW SOLAR & BATTERY to see the solar and battery readings Cala receives. See Set up Solar & Battery.
Tap the (i) icon at the top right to see what's shared: what Cala receives from Home Assistant, what Home Assistant receives from Cala, and what Home Assistant can control.
If your home has more than one Cala, each one pairs with Home Assistant on its own. The screen shows a card for each water heater, named HA- followed by its name, with either its PAIRING CODE or CONNECTED.
Disconnect Cala from Home Assistant
From the Cala app
-
In the Cala app, go to SYSTEM INTEGRATIONS → Home Assistant.
-
Tap Disconnect Home Assistant. With more than one Cala, tap Disconnect on the card for the water heater you want.
-
Tap DISCONNECT to confirm. Cala stops receiving your solar and battery data from Home Assistant and goes back to its normal heating plan. You can pair again at any time from your Cala's screen.
Then remove the integration in Home Assistant: go to Settings → Devices & services → Cala, open the menu (⋮) and delete it.
From your Cala's screen
-
On your Cala's screen, open SETTINGS → ADVANCED → HOME ASSISTANT.
-
Press Down until DISCONNECT is highlighted, then press Select. Your Cala stops sending data to Home Assistant and shows a new pairing code.
-
In Home Assistant, go to Settings → Devices & services → Cala, open the menu (⋮) and delete the integration.